Sampling of environmental water for low level CFC/SF6 analysis
A. Methods Accepted of Samplig Water from Wells ot Springs
Samples must be pumped from wells or springs. Bailers or immersing the bottle will give unacceptable results because the sample will come in contact with air and will be contaminated by CFCs and SF6 that are in the air.
Some plastic materials may contaminate a water sample because small amounts of plastizers will leach into the water sample. Avoid the use of soft PVC tubing, such as Tygon. Hard or rigid types of plastic are fine. Viton or silicone tubing is also fine. Also avoid the use of any type of lubricants, such as oils, greases, or sprays. Even small amounts of these materials will contaminate a sample. Insect repellent is another potential source of contamination.
B. Collection of Water for Low-Level CFC/SF6
Source of bottles and caps
Bottles and caps will be provided by the Tritium laboratory upon request if the client pays for shipping.
If the client wishes to purchase their own bottles what is needed are 500 ml (16 oz) boston round clear glass with a cap size of 28-400. Bottles can be obtained from many different sources that supply glass containers.
The best caps to use are lined with pulp-aluminum foil. The caps themselves can be plastic or metal. Do not use the cap if the foil liner is dented or scratched. Caps with pulp-aluminum foil liners can be obtained the same sources that offer bottles.
Other acceptable caps liners are polyethylene or teflon.
Filling procedure
The bottles and caps should be THOROUGHLY rinsed with the water to be sampled. The bottles are filled and capped underwater in a beaker. The filling procedure is carried out within an over flow container. A two to four liter beaker or bucket is fine. Fill 3 bottles per sample.
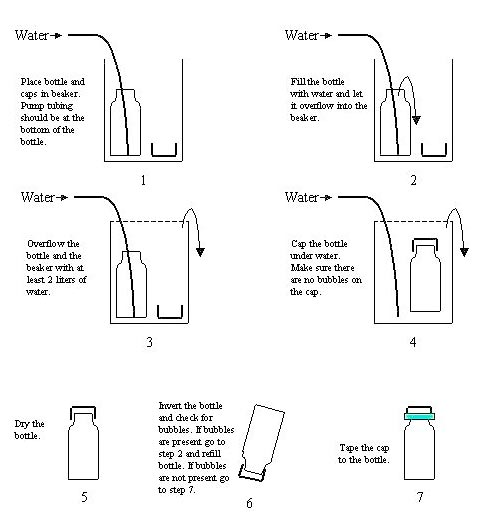
The procedure is shown below and is as follows (refer to the figure below):
- After the well has been purged, place the bottle in the overfloe container and then insert the end of the tubing from the pump all the way into the bottom of the bottle. Also place all the caps (2 or more) in the beaker.
- Fill the bottle as shown with water until it overflows.
- Continue to overflow the bottle until the conainer also overflows. Allow 2 liters of water to flow through the bottle and out of the beaker if that much water is available.
- Select a cap from the bottom of the beaker and tap it under water to dislodge air bubbles. Remove the pump tube from the bottle and cap the bottle TIGHTLY underwater without allowing the water in the bottle to come in contact with air. Flushing the bottle with more water is far better than with less water.
- Remove the bottle from the beaker and dry it.
- Invert the bottle, tap it and check it for air bubbles. If there are bubbles, repeat the procedure from step 2 above. If it is necessary to refill the bottle, you must use a new cap.
- If there are no bubbles present, securely tape the cap to the bottle with electrical tape. Wrap the tape in a clockwise direction looking down at the bottle top. Do not forget to label each bottle with the well name, date, and time of sampling and the sequence number of each bottle as it was collected (i.e. 1, 2, etc).
USE ONLY THE BOTTLE CAPS DESCRIBED IN THE TEXT ABOVE
Because the entire contents of each sample must be used for the analysis, it is recommended that you take duplicate or triplicate samples from each source. This will provide backups in case one of the samples is lost during shipping or during the analytical procedure. We will typically analyze the duplicate or triplicate samples and provide the results to the submitter at no additional cost.